
NEWS

I. The Importance of Proper Installation
1. Establishing and Maintaining an Absolute Seal Across the "Three Chambers"
The cylinder head gasket serves as the sole physical barrier separating the engine's three major high-pressure systems: the combustion chamber, the oil passages, and the coolant passages. Proper installation ensures the following:
(1) Sealing Combustion Gases: It withstands combustion pressures reaching tens or even hundreds of atmospheres, ensuring that energy is fully utilized to drive the pistons and generate power.
(2) Isolating Engine Oil and Coolant: It prevents the "mixing of oil and water."
(3) Ensuring Circulation within Respective Systems: Internal leaks can lead to abnormal pressure in the cooling system and a drop in oil pressure, potentially causing the entire thermal management and lubrication systems to fail.
2. Critical Impact on Generator Performance and Reliability
(1) Safeguarding Rated Output Power and Efficiency: A well-sealed combustion chamber ensures that the compression ratio and combustion efficiency remain within the design specifications, enabling the generator to deliver the rated power (kW/kVA) indicated on its nameplate while maintaining optimal fuel consumption rates. Leaks result in fuel wastage and insufficient power output.
(2) Maintaining Operational Stability and Power Quality: For backup power systems, start-up speed and voltage/frequency stability are paramount. Power fluctuations caused by poor cylinder sealing directly compromise power quality and may potentially damage sensitive electronic equipment.
(3) Ensuring Start-up Reliability: Sufficient compression pressure is critical for the cold-starting of diesel engines. Gasket leaks are a common cause of start-up failures or prolonged cranking times.
3. The Installation Process Itself Serves as a Critical "Health Check"
A proper installation procedure mandates a rigorous inspection of all related components, thereby allowing for the early detection of potential issues:
(1) Checking the Flatness of the Cylinder Head and Block: This allows for the detection of minute deformations—often caused by overheating or mechanical stress—enabling timely repairs and the elimination of potential hazards.
(2) Cleaning Bolt Holes and Threads: This prevents torque inaccuracies caused by contaminants and protects the cylinder block threads, which constitute a critical structural foundation.
(3) Using New Bolts and Applying Precise Tightening: This ensures the long-term stability of the "clamping force" required by the design—a fundamental prerequisite for the gasket to perform its sealing function effectively. II. Preparation
1. Tools and Materials
(1) New Cylinder Head Gasket: Ensure the model matches the engine exactly (pay close attention to thickness, as well as the positioning of water and oil passages). The use of Original Equipment Manufacturer (OEM) parts is recommended.
(2) Torque Wrench: Must be pre-calibrated to ensure accuracy.
(3) Sockets and Wrenches: Must be compatible with the cylinder head bolts.
(4) Cylinder Head Bolts: It is *strongly* recommended to use brand-new OEM cylinder head bolts. Old bolts may have already undergone plastic deformation, which is a common cause of sealing failure.
(5) Cleaning Agent: Carburetor cleaner or a specialized parts cleaner.
(6) Scraper (plastic or wooden), Precision Straightedge (or Knife-edge Straightedge), and Feeler Gauges.
(7) Non-woven cloths or lint-free rags.
(8) Gloves: Oil-resistant gloves to protect your hands.
(9) Engine Repair Manual: You *must* obtain the official service manual specific to this engine model to verify all critical parameters.
2. Inspection and Cleaning
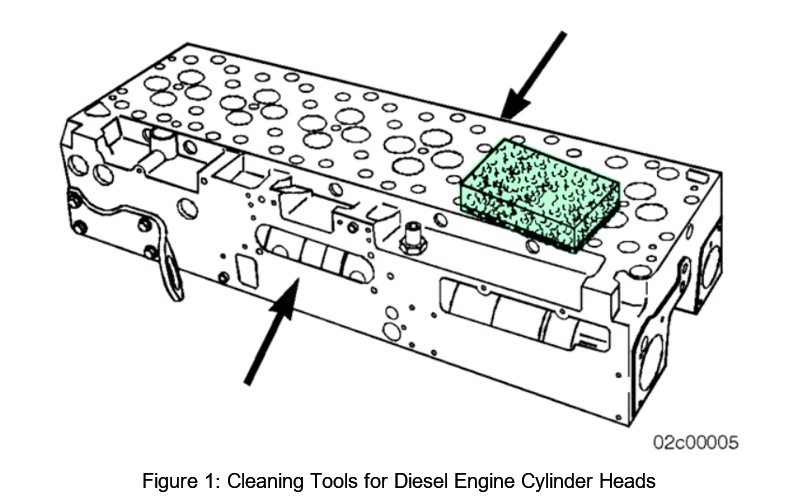
(1) Cylinder Block Deck: Use specialized tools to remove all residue from the old gasket (as shown in Figure 1). The use of metal scrapers or sandpaper is strictly prohibited to avoid scratching the deck surface. After cleaning, use a straightedge and feeler gauges to check for flatness; take measurements in multiple directions—diagonally, longitudinally, and transversely—as shown in Figure 2. The flatness deviation must be less than the value specified in the manual (typically no more than 0.05–0.10 mm per meter of length). If any warping is detected, professional milling or resurfacing is required.
(2) Cylinder Head Deck: Perform a thorough cleaning and inspection using the same methods. Check for any cracks in the areas surrounding the valves and fuel injectors.
(3) Cylinder Head Bolt Holes: Use compressed air or a suction tool to blow out any oil, water, or debris from inside the bolt holes. This prevents hydraulic lock—which could cause the cylinder block to crack or result in inaccurate torque readings—during the bolt tightening process.
(4) Piston Crowns: If the pistons are positioned at Top Dead Center (TDC), clean off any carbon deposits.

III. Installation Steps
Using a non-woven cloth dampened with a cleaning agent, wipe down the mating surfaces of the cylinder block and cylinder head once more to ensure they are completely free of oil stains, dust, and fingerprints. Keep the surfaces dry.
1. Placing the New Cylinder Head Gasket
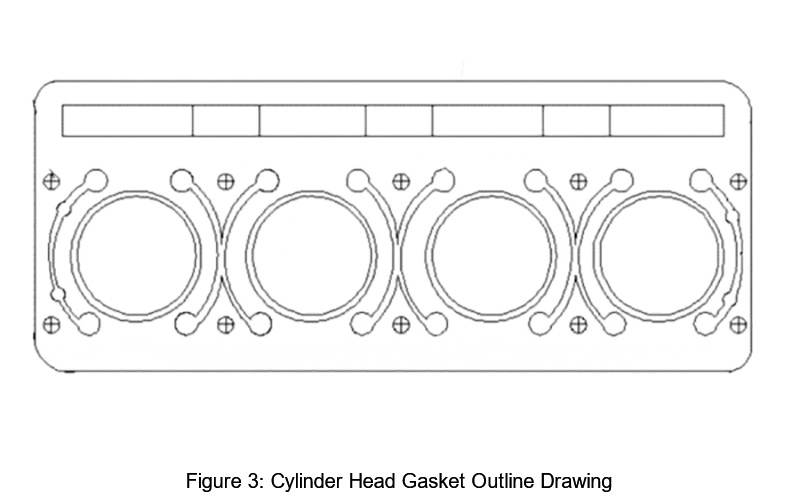
(1) Carefully verify orientation: The cylinder head gasket typically features specific markings for oil passages and water passages; its shape is illustrated in Figure 3. Ensure that the gasket aligns perfectly with all water passages, oil passages, and cylinder bores.
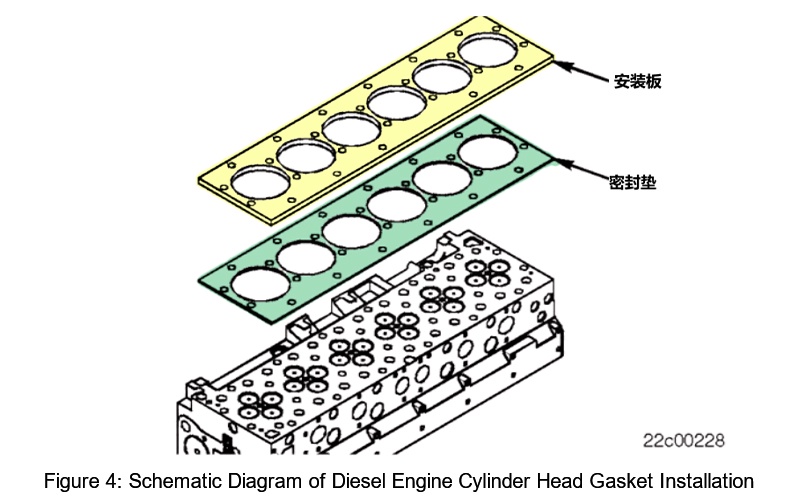
(2) Position smoothly: As shown in Figure 4, place the gasket onto the combustion face of the cylinder head and use alignment pins to ensure proper positioning, verifying that the side marked "EXHAUST" faces the exhaust side of the cylinder head. Do *not* use any sealant! High-quality modern cylinder head gaskets come with a built-in sealing coating; applying additional sealant may actually cause the gasket to shift or result in a poor seal.
2. Installing the Cylinder Head and Bolts
Lower the cylinder head smoothly and vertically, avoiding any lateral movement that could scratch the gasket.
(1) Lubricate the bolts: Apply a thin layer of engine oil to the threads and beneath the washers of the new bolts (refer to the service manual, as specific lubricants or dry tightening may be specified in some cases).
(2) Hand-tighten: Hand-thread all bolts into their respective holes for several turns to ensure they engage smoothly.
(3) Initial Tightening (Pre-tightening): Follow the "tightening sequence" specified in the service manual (typically a symmetrical, cross-patterned, multi-step process working outward from the center). This ensures even pressure distribution and prevents deformation of the cylinder head. Using a standard wrench, tighten all bolts—following the specified sequence—to the initial torque value specified in the manual (e.g., 50 N·m).
(4) Final Tightening: Using a torque wrench, strictly follow the *exact same sequence* to tighten all bolts to the final torque value specified in the manual (e.g., 200 N·m). Many modern engines also require an additional angular rotation (e.g., 90° or 120°) after the final torque value has been reached. This ensures that the bolts generate a precise and consistent clamping force within their plastic deformation zone. Always strictly adhere to the specifications outlined in the service manual. (5) Installation of Additional Components: Install the rocker arm assembly, fuel injectors, intake and exhaust manifolds, thermostat housing, coolant hoses, high-pressure fuel lines, and other accessories. Ensure that all interface gaskets have been replaced.
3. Post-Installation Inspection and Test Run
(1) Static Inspection: Fill the system with coolant and engine oil, and check all connections for any leaks.
(2) Initial Startup: Start the engine and allow it to idle until it reaches its normal operating temperature. Pay particular attention to checking for any cross-contamination between the engine oil and coolant (e.g., water ingress into the oil pan or oil floating in the radiator). Verify that exhaust emissions appear normal and listen for any abnormal air leaks.
(3) Post-Warm-up Retightening: After shutting down the engine, allow it to cool down completely (preferably overnight). Re-check the torque of all cylinder head bolts, following the specified tightening sequence and torque values. Due to thermal expansion and contraction, some bolts may have loosened; this step ensures the long-term reliability of the seal.
(4) Load Testing: After operating the generator under load for a period of time, perform a final check for any leaks.
NANBOWAN
Professional generator set manufacturer
24/7 before-sales and after-sales services
Comprehensive technical support